How to properly use your ink stamp
Rubber Stamp
We recommend you use high-quality, water-based ink for your rubber stamp. We recommend Shiny Stamp pads. You can purchase stamp pads in 4 sizes and in five colors on our Stamp Accessories page. When inking your stamp, use light pressure to press your stamp against the ink pad. Using even, downward pressure, press your stamp onto your document. Avoid using a rocking motion to make your imprint.
There is no need to clean off your stamp in between impressions.
Shiny Self-Inkers
Shiny has included all necessarily accessories for properly storing your stamp (ie: caps, boxes, etc). Keep your stamp in a dust-free environment of moderate temperature. Extreme temperature changes can affect the adhesives and inks used in your stamp resulting in poor quality imprints or stamp malfunction.
To use your stamp, remove the dust cap and press down on the top of the stamp to make your impression. There is no need to clean the stamp off between impressions. To replace the cap, compress the stamp, push in the red buttons on the sides to lock the stamp in place and slide the cover on. Store the stamp in the original box. Ink pads can be replaced as needed. Replacements ink pad can be purchased on our Stamp Accessories page.
Shiny Pre-Inked Stamps and Pocket Stamps
Your stamp was sent with all necessarily accessories for properly storing your stamp (ie: caps, boxes, etc). Keep your stamp in a dust-free environment of moderate temperature. Extreme temperature changes can affect the adhesives and inks used in your stamp resulting in poor quality imprints or stamp malfunction. Your stamp should be stored in an upright position.
To use your stamp, remove the dust cap and press down on the top of the stamp to make your impression. Replace the cap and store stamp in the original box. Please note, your pre-inked and pocket stamp die (the part displaying your information) is delicate and any nicks or fingerprints will affect the quality of the impression. These stamps do not need be to cleaned. Replacement ink can be purchased on our Stamp Accessories page in 1/2 or 2 ounces bottles.
How to properly use your embosser
Your embosser was created using Delrin. Delrin is a light-weight, rigid, wear resistant type of plastic. Your embosser should only be used to emboss one sheet of standard weight paper at a time. Using your embosser on multiple sheets at a time or on other materials (such as mylar) may cause your embosser insert to bend or bow which is not covered under our guarantee.
Your desk, long reach and extra long reach embosser was shipped assembled and ready to use. Simply insert your single sheet of paper in between the dies and press down on the handle using light to moderate pressure. If you find your impression was not crisp and clear, try applying a little more pressure. Always make sure your embosser insert is seated properly before using it.
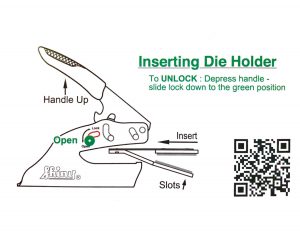
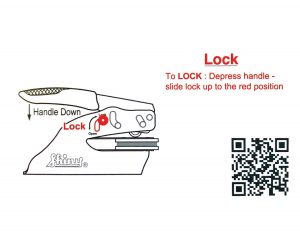
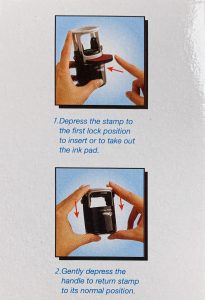
Your compact embosser needs to be assembled before use. After removing the embosser from the case, you must insert the die holder into place before use. The images below show how to correctly do this
To make in impression, insert your paper and squeeze. Make sure the rectangular notches on the bottom of the die holder are seated in place before using your embosser to avoid bending your insert.
How to use your Electronic Files
In Microsoft Word:
The instructions below show how to insert your stamp into Microsoft Word. The instructions are shown using Word 2016.
- Open the document that you want to insert your stamp into
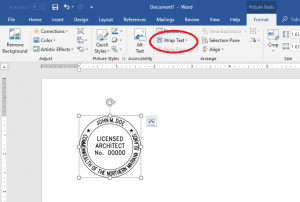
- Select the Insert tab; click on pictures (See Picture Below). Select your electronic stamp file.
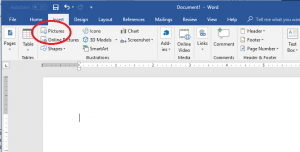
- To adjust the location of your stamp, click on the stamp, then on the format tab and select wrap text.
In Adobe Acrobat:
The instructions below show how to insert your stamp into Adobe Acrobat. The instructions are shown using Adobe Acrobat X, XI, and DC.
Adobe Acrobat X
- Open Document
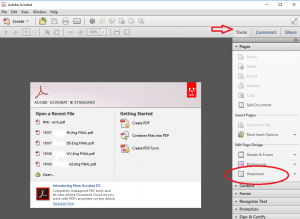
- Selects Tools; Insert a watermark. (See Picture Below)
Adobe Acrobat XI
- Open Document
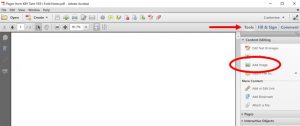
- Click on Tools; select add image (See Picture Below)
Adobe Acrobat DC
- Open Document
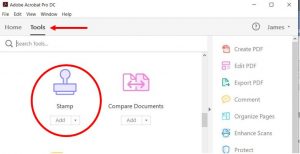
- Click on Tools; Scroll down to Stamp and click Add (See Picture Below)
In AutoCAD:
The instructions below show how to insert your stamp into AutoCAD. The instructions are shown using 2014 AutoCAD.
- Open the document that you want to insert stamp into
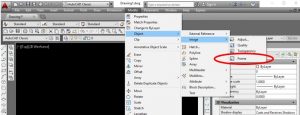
- Insert Tab, Raster Image Reference (See Picture Below)
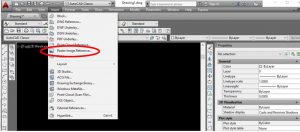
- Adjust if image border prints under modify tab (See Picture Below)
-
- Select Object, Image, Frame
- Select 1 for On, 0 for Off
-
How to replace or refill your ink
Self-Inking Stamps
Your self-inking stamp uses water-based ink pads. You must replace your ink pads with the appropriate pad for your make and model stamp. We recommend replacing your ink pad as opposed to adding ink to your existing ink pad. After removing the cover from your replacement ink pad, slightly compress your stamp to reveal the old ink pad. Pushing against the ink pad will allow you to slide it out. Then slide in the new pad until it snaps into place.
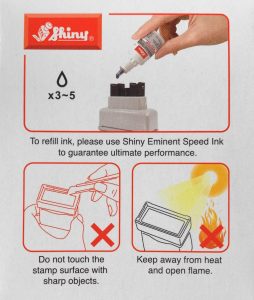
Pre-Inked Stamps
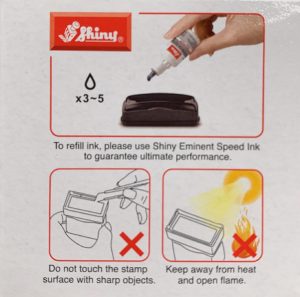
Your pre-inked stamp uses an oil-based ink. We recommend using Shiny Eminent Speed Ink. The photo below shows how to re-ink your stamp. You will need to pull up firmly to remove the handle. Add ink slowly so you do not over ink your stamp. Allow the stamp to set overnight before adding more ink, if necessary
Pocket Stamp
Your pocket stamp uses an oil-based ink. We recommend using Shiny Eminent Speed Ink. To re-ink your stamp, remove the clear cover and the index paper/label from the top of your stamp. Add 3-5 drops of ink into the hole on the top of your stamp. Allow the stamp to set overnight before adding more ink, if necessary.